If you’re planning to install new cabinets in your home, you need to make sure the wall is level and plumb before starting. Also, use masking tape on the filler strips. This will prevent any leaks.
Custom built-in cabinets are a great way to add storage and aesthetic appeal to your home. They can be installed on walls, in corner units, or integrated into other kitchen or living room furniture. Whether you want to display your DVD collection or organize a large collection of books, custom cabinetry is an ideal solution.
Before installing your new cabinetry, make sure you consider how much space you’ll have. In general, you should create at least a 12-inch-deep shelf for the cabinet. This will allow you to keep all your essentials within easy reach. You can also install additional open shelving if you want.
Depending on the shape and size of your empty space, you may need to purchase filler pieces. These pieces are made of wood and are placed between the cabinets to create a more uniform look. To prevent the cabinets from looking out of place, try to coordinate the colors of the filler with the other major items in the room.
If you plan to install the cabinets on the wall, make sure that the base is flush with the wall. A carpenter’s level is the best tool to ensure that the lines are plumb.
Next, determine the height of the cabinets. This should be measured from the floor to the countertop. The ceiling height can vary, depending on the type of room.
When installing the cabinet, be careful not to drill through air conditioning vents or heating registers. Usually, the preferred method for installing built-ins is to mount them to a wall stud.
Using toggle bolts is another good option for mounting cabinets to drywall. These screws have a washer built into the head.
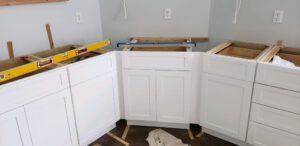
The first step to installing upper cabinets is to create a layout. This should show you where electrical outlets, plumbing, and ventilation ducts will be installed. Also, it can show you what appliances will fit in the space.
Next, determine the height of the cabinet. A good rule of thumb is that the top of the cabinet should be at least three inches above the countertop. If you have a backsplash, the ideal height may be a little higher. You can use a stud finder to help you locate the studs.
Once you have found the studs, you will need to drill holes into the back of the cabinets. It is a good idea to drill the pilot hole big enough to accommodate 2-inch screws.
Then, you will need to secure the cabinet to the studs. One way is to use a ledger board. These are temporary boards that can be placed into the studs to support the weight of the cabinet while it is being mounted.
Another option is to drive screws through the back of the cabinets and into the wall studs. While this will be a bit more time-consuming, it is more reliable.
In addition to the studs, you should consider attaching cleats to each cabinet unit. Clats are small pieces of wood or metal that are used to hold each cabinet together and prevent them from toppling over during installation.
When installing the cabinets, it is important to check the walls for levelness. For example, if the wall has dents, you may need to shimming the cabinet.
During installation, you will also need to watch for the electrical points, ventilation ducts, and other plumbing points.
If you’re building a kitchen, you may want to add filler strips to the back of your cabinets. These are wooden pieces that you can place between the wall and cabinet frame. Filler strips come in a variety of lengths and widths. You’ll find them at home improvement stores.
When installing filler strips, you’ll need to use a scribe tool. This scribe tool will help you transfer the contour of your wall to the face of your cabinet. It can also help you measure gaps.
The scribing process is easier if you practice with some scrap wood first. In addition, it’s best to use a compass. With a compass, you can make sure you’re scribing accurately.